Waiting For Spring
I have the planting planned. I have the improvements planned. I have the budgeting planned for said improvements. I have materials acquired to start implementing said improvements. I have seeds arriving. I am ready for gardening! Mother Nature? Not so much.
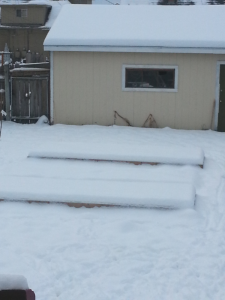
This is what the garden looks like. It is under approximately 6″ of February snow, which is a little unusual this time of year, but certainly not out of the question since it is still winter, and this is the Pacific Northwest. I love snow. Really love it. I love the winter and having four seasons, however, when it gets to February, I am about done with winter, and so ready for spring. That feeling is more intense this year than in years past. And, of course, this is because I am ready to get started.
Luckily, it is also the time of year that I can start tomatoes, peppers and some herbs from seed so the are ready to be transplanted into the garden beds in about 6 weeks. I have tried to do this in the past, and because of my ignorance (lack of knowledge), I did not achieve success. I tried to start seeds in a windowsill. Sounded like a good idea to me. However, this produced “leggy” starts due to the lack of a good, direct light source. Leggy starts end up being a much weaker plant, which means they will not grow as well and thus not produce as well. I also attempted to transplant them into the main garden far to early.
Well, I learned my lesson, so this year I planned on building a grow area with a good light source that would enable me to grow good, healthy, strong starts for planting when the time was right. I decided to make a space in the unfinished basement for this purpose. This was mainly chosen due to limited space on the main floor. The basement is used for storage only, and is rarely visited by anyone other than me. After much research, watching many videos on YouTube and reading several articles on the Internet, I settled on my design, and I went about putting it into place. This is my first expansion/improvement over last year’s garden!
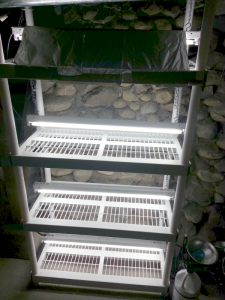
Here is the completed grow shelf. It is an inexpensive shelf unit. It provides 4 shelves, 3′ wide and 18″ deep, on which to start/grow seed starts. Each shelf has a dedicated fluorescent lamp. I am using a T5-type fluorescent bulb that provides 6500 Kelvins. The Kelvins indicate the color temperature that the light outputs. In this case, 6500 K is the same color temperature as daylight. My research indicated that this is the ideal amount to grow seed starts indoors.
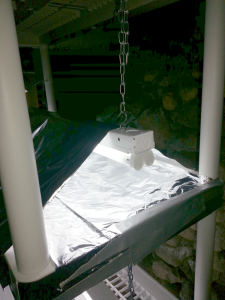
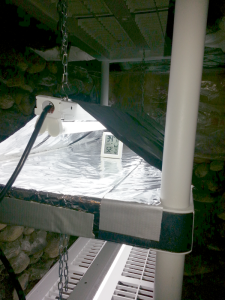
One of the concerns, is temperature. Seed germination generally occurs best if the temperature is around 75 degrees plus or minus 10 degrees depending on the type of plant. Because the basement is unfinished (read: unheated), and it is February, it is definitely not warm enough. I considered a few possible ways around this issue, and performed many different tests and layouts looking to hit the magical 75 degrees mark. In the end, what looks to work the best is simply covering the bottom of the shelf with aluminum foil and running foil over the top of the light. When using foil, make sure the shiny side is facing the light to achieve maximum effect.
I know the thermometer only reads 52 degrees in the picture. I had just turned the lights on for taking pictures. 🙂 I know I will need to, most likely, alter how I have the foil arranged once I get the seed trays in place, however, I am confident that I can achieve the correct temperature. If I need a little extra warmth, I have some heat lights I can clip to the sides of the shelf.
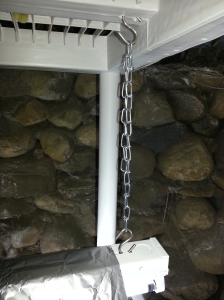
I also hacked the shelf a little. I wanted to attach the lights to a chain so that I could easily raise and lower them as the situation called for. The shelves did not have any holes in the bottom along the center, and I did not want to hang the hooks off-center. I simply drilled some holes in the bottom of the shelf and put the hooks through. Simple and effective!
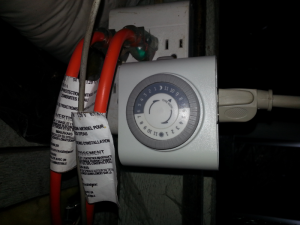
I have all the lights plugged into a power strip. The power strip is plugged into this simple timer. Seeds like about 16 hours of light a day in order to grow the best. I certainly did not want to have to remember when to turn the lights on or off. It makes much more sense to install this timer, set it, and automate this step. I’ll be busy enough watering, fertilizing, and growing the seedlings!
And there you have it. An improvement to the garden, a solution to the problem of growing good, healthy starts indoors, and a simple way to combat the winter blahs all in one. My daughter and I will be planting the first batch of seeds as soon as I get some good, organic, sterile seed starting soil, which will be in about a week.
Until then, Happy Gardening!
Posted on February 11, 2014, in Equipment and Accessories, Garden Improvements, Gardening, Seed Starts and tagged gardening, grow shelf, growing, seed starts, seedlings, winter blahs. Bookmark the permalink. 4 Comments.
Hi Robert, looking like a great start already.
Pingback: 2014 Garden – Update 1 | Gardening is Bliss
Pingback: Garden Improvement – Hoop Houses – Update 1 | Gardening is Bliss
Pingback: 2014 Garden – Update 4 | Gardening is Bliss