Category Archives: Seed Starts

2014 Garden – Update 4

I have been lax in updating, I know. It isn’t because I haven’t wanted too, it is because writing about the garden only happens when I am not doing something with the garden, which lately, has been just about non-stop. The weather is slowly improving here in the great Pacific Northwest. The nights are still getting cool, and the days are remaining in the low 60’s for the most part. Due to the improvements, I have been able to plant more plants outside, including sowing some direct into the ground. However, because it is quite cool still, I have planted other crops inside. I have also made some adjustments inside that, I think, have improved what I am seeing big time!

First, the adjustment. As I wrote about in this post, I had the grow shelf in the cool, unfinished basement. And, while the plants that I had germinated, specifically the tomatoes and peppers, where all doing well, they did not seem to growing as fast, or as large, as I would expect. I began to suspect that the cool temperatures may have something to do with this as I know tomatoes and peppers adore the warmer weather, and it takes temperatures of 70-80 degrees for their seeds to germinate. I also began to wonder why I had put the grow shelf in the basement in the first place. There was another, possibly better, site for it. That would be in my ‘office’. A room, upstairs, where I have my computer. My computer is rarely turned off, and as a result, the office remains quite toasty. Last Saturday, the 5th, I made the sudden decision to move everything to the office. It probably only took a couple of hours to move the plants, shelf, and light fixtures upstairs, and re-set it all up.Grow Shelf Upstairs 04-09-2014 The grow shelf, and four grow lights (plus extra ones, sometimes), caused my already warm office to get extra toasty. So much so, in fact, that I have had to begin using the window air conditioner to keep the temperature manageable. Based on the thermometer, it is usually between 71 and 78 degrees in the office now. I have seen the plants respond in a huge way! The tomatoes have exploded as have several of the other varieties. The peppers are also starting to put on some size. Of course, I also transplanted them into bigger containers at this time. This, also, had a big impact on growth. Very exciting, and I am glad I was able to remedy a situation so easily.

Next, the plants I have been able to plant, or direct seed outside:

Cabbage [transplants from seed]:

Cauliflower [transplants from seed]:

Greens [direct seeded]:

Onions [sets]:

Peas [transplants from seed/direct seeded]:

Radishes [direct seeded]:

Carrots [direct seeded]:

  • Purple Haze
  • Rainbow Blend

Potatoes:

  • All Blue
  • French Fingerling
  • Purple Majesty
  • Red Norland
  • Yellow Finn
  • Yukon Gold

Beets [direct seeded]:

Herbs [transplants from seed]:

The garden is starting to green up, and I could not be more pleased. I was able to plant a lot out in April, which last year I was not due to lack of beds. May will see, of course, another huge dose of planting. I am currently preparing for that in the grow room. Meet the newest additions to join the grow room family:

Cucumbers:

Corn:

Nasturtium

I began working, today, on hardening off the tomatoes. In my impatience, I think I left them out too long and some of them got a little sunburned. I do think they will recover quick enough, and I did bring them in tonight, as it is going to be in the upper 30’s, and I am not comfortable leaving them out all night in the hoop houses. I think that may still be a little chilly. The next few nights, however, the temps are supposed to stay in the 40’s at night, so I may try leaving them under the hoops then and see how they do. I am quite anxious to get the tomatoes (and peppers) in the ground, but I do not want to cause any undo stress or other issues for them. Patience is a Virtue, and All Good Things Come to Those That Wait. Those are the mantras I have told myself lately. 🙂

I do have a couple of other updates, but I will save them for their own posts, which, I hope, will not take me as long as this post took to get out. No promises, but I will do my best!

Until then, Happy Gardening!

2014 Garden – Update 3

I am in the land of the Peas! Wow. I seriously did not expect them to take off the way they did. They are getting so big I used some left over wooden dowels to give them support. They are much happier now.

Peas with Dowel Supports 03-19-2014

I also made a startling discovery earlier in the week when I was checking up on everything. I moved some of the peas to another shelf and saw roots growing way out of the bottom.

Pea Roots 03-16-2014

I had an emergency transplanting session the next evening.

Peas 03-19-2014 Peas2 03-19-2014

These particular pea plants are not as tall as the others, so I was completely unaware that they needed more space. All in all, I think I have learned that it is not really necessary to start peas inside. Next year this won’t even be a consideration. They will go right out into the ground as soon as it is workable. The good news is, if all goes as planned (i.e. the weather cooperates), I will be planting them this weekend as well as the onions sets and shallots.

In other garden update news, on the 11th I planted some more plants.

Herbs

Garden Berries

Cabbage

Green Onions

Of these, the onions have begun germinating already. You can see them in the cells behind the peppers.

Peppers and Green Onion 03-19-2014

The Genovese Basil, Lemon Balm, and the Early Wakefield Cabbage is also germinating, however, I did not take a picture of them this time. Over all, all the starts are doing rather well. Tomatoes, Marigolds, Cabbage, and Cauliflower is seen here in this picture. They are all doing well.

Tomatoes, Marigolds, Cabbage and Cailiflower 03-19-2014

I found that some of the tomatoes where on a shelf where the light was a little higher than I would have liked, and I am rather concerned that they may have gotten a little leggy reaching for the light. I have since lowered the light so it is just above the plants. Hopefully the legginess is not too debilitating. You can see them on the right of this picture. On the left is the Chamomile and Plantain, which is doing quite wonderful.

(Possibly)Leggy Tomatoes and Herbs 03-19-2014

Since the seed starting soil I used to germinate in does not have an over abundance of nutrients, on the 15th of March, when I watered them, I added a very diluted organic liquid fertilizer. I do not plan on needing to feed the plants once they are in the ground, as the soil is sufficiently nutrient dense to provide ample food for them as they grow. In addition, this summer I intend on adding my own home brewed compost tea as needed which will provide more nutrients that the plants will love!

Last fall, I planted 20 garlic cloves. I do not recall what kind of garlic it was. All I know is I purchased it in September at one of our local Farmer’s Market. I checked today (March 19th), and  it is looking good!

Garlic1 03-19-2014

There are four in coming up in this picture, but only a couple are easily seen.

Galic 4 Starts 03-19-2014

We also planted 5 Golden Raspberry plants last year. Our dogs had their way with most of them, but as I expected, they are coming back. I suspect they will come back with a vengeance, as we want them to fill the area where we planted them. It is a little hard to see, but this pic does show a shoot coming up. They were so sweet and tasty. I cannot wait to munch on them again this year!

Golden Raspberry 03-19-2014

Everything is going quite well. The time for getting plants in the ground is rapidly approaching, and I cannot wait!

Until then, Happy Gardening!

2014 Garden – Update 2

This post will largely consist of pics of the growth progress, as I think that will do more than the words I add. I will say, everything is growing quite well! Just about everything has germinated, which includes all the tomatoes, the celery (which, I have read, is hard to grow), and most of the peppers! The peas are doing so well, that I worry I won’t have the beds ready in time!

First a picture of how I have the shelves set up currently. The top shelf is my ‘after germination’ shelf. It is where I move the plants that have germinated well, which occurs on shelf 2. It has the most heat directed at it, since things like tomato seeds and pepper seeds like that. The third self is the ‘medium-height’ shelf. Once a plant is too big for the top shelf, I move it to the third. Don’t ask why I have them ordered so funky. It just happened that way. The bottom, and fourth shelf (which is not seen in this picture), will be where I move the plants that are getting big, like the peas. Grow Shelf (1-3) Confiuration 03-05-2014In most of these pictures, the plant name is visible on the Popsicle stick. This first one is when the celery first pushed above the soil. I took this picture March 6th.

Celery 03-06-2014

Peas!

Peas 03-05-2014

Peas2 03-05-2014

Peas3 03-05-2014

Herbs and Cauliflower.

Herbs and Cauliflower 03-06-2014

Marigolds and Peas, and Cabbage.

Marigold and Peas 03-06-2014

Marigolds and Cabbage 03-06-2014

Tomatoes!

Tomatoes 03-06-2014

Tomatoes2 03-06-2014

Tomatoes3 03-06-2014

Tomatoes5 03-06-2014

This is the very first pepper (Paprika) just starting to push up through the soil. I was so pleased to see this!

Paprika Pepper 03-01-2014

The last photo, I took yesterday, March 9th. I was out working in the beds on an improvement project (that update is coming very soon), and I saw this growing in one of my squares. I had planted onion seed last year, but it did not have time to do anything. It was covered all winter with a blanket of dried leaves, and had wintered-over successfully. I hadn’t meant to do that. Happy accident! 🙂

Winer Over Onions 03-09-2014

And that is how the garden is growing at the start of the second week of March. Time is a ticking, and I need to get a lot done in a short amount of time. Stay tuned for further updates to this series, as well as the start of some new post series’.

Until then, Happy Gardening!

2014 Garden – Update 1

The weather is still quite funky. The temps where down to the teens for a high on March 1st. Then we got 5+ more inches of snow. What a start to March! 🙂

I have been busy. Both with my day job, and with the garden. This has made me quite lax in writing, however, sleep comes before writing. These garden update posts will focus on the actual planting, growing, and harvesting that goes on for the garden. So, without further adieu, on to the update…!

I sowed the first seeds over the weekend of the 22nd of February. These are all indoor starts, and are growing on the grow shelf I built. So far I have planted:

Cabbage Cauliflower Celery
Mammoth Red Rock Purple of Sicily Giant Red Re-Selection
Glory of Enkhuizen Snowball Self-Blanching Utah Tall
Herbs Peas Flowers
Chamomile Désirée Dwarf Blauwschokkers Petite Mix Marigold
Crown Jewels Chia Golden Sweet Snow
White Horehound Little Marvel Garden
Korean Hyssop Oregon Sugar Pod II
Oregano Vulgare
Plantain
Summer Savory
Shiso
Toothache Plant
Lemon Balm
Broad Leaf Sage
Valerian
Hot Peppers Sweet Peppers Tomatoes
Black Hungarian Corno Di Toro Giallo Black Krim
Cayenne Long Thin Golden Cal Wonder Blue Berries
Chinese Five Color Golden Marconi Blush
India Jwala Peperone Di Cuneo Pink Brandywine
Leutschauer Paprika Quadrato D’Asti Rosso Chadwick Cherry
Mustard Habanero Gypsy
Purple Jalapeno Ivory Pear
Martino’s Roma
Michael Pollan
Orange Icicle
Pineapple
Tasmanian Blushing

Phew! No wonder I haven’t had much time to write! 🙂 If you  look at some of those beautiful plants, you will see that I am going to, hopefully, grow a very colorful garden this year. But, I digress..

I have found that nurturing plants from seeds is enjoyable. I tend to think of them as my babies, and right now they need extra tender care and careful monitoring. Unsurprisingly, the cabbages and cauliflowers where the first to germinate. These plants do quite well in cooler temperatures, and as I said in an earlier post, the basement is on the cool side. Interestingly, only the Mammoth Red Rock cabbage has germinated. The Glory of Enkhuizen hasn’t. I find that odd, but I am still monitoring the situation.

Cabbage and Cauliflower Germinating 2-26-2014

(this shows the Mammoth Red Rock Cabbage in the foreground and the Purple of Sicily Cauliflower in the back) Cauliflower Germinating 2-26-2014

These guys popped up on the 26th, and I was glad to see them. It was a bit of a relief to see those green little nubs poking above the soil. It let me        know I was doing something right.

 The peas began pushing themselves through next. Peas and some of the herbs (although I only took pictures of the peas). 

Peas Germinating 2-28-2014Peas Germinating2 2-28-2014 All of the varieties of peas I planted started to come up at all about the same time, about the 27th of February. Peas are not very shy about it, either. They practically shoot out of the dirt. It would be fun to have a time-lapse camera on the shelves. Maybe one year. 🙂

I began to get a little concerned over the lack of growth I was seeing from the tomatoes. I had friends with tomatoes that came up after only a couple of days. I know that they need a warmer soil temperature to germinate quickly.

Tomatoes Germinating 03-03-2014

I rearranged their placement onto another shelf, and added four additional heat lamps. After only 2 days of that, I started to see tomatoes! I took this picture on the 3rd of March. There are also even more herbs growing. Now, the only thing I am waiting for, is the peppers. They can take a while longer due to their seeds, and they also require warm soil, warmer than tomatoes, even. I may need to rearrange again for them to do well. Time will tell.

I will take some more pictures in the next couple of days as the young plants grow while I wait for Winter to retire.

Until then, Happy Gardening!

Waiting For Spring

I have the planting planned. I have the improvements planned. I have the budgeting planned for said improvements. I have materials acquired to start implementing said improvements. I have seeds arriving. I am ready for gardening! Mother Nature? Not so much.

Snow Covered 02-11-2014

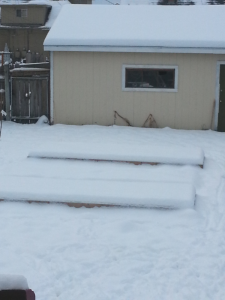
This is what the garden looks like. It is under approximately 6″ of February snow, which is a little unusual this time of year, but certainly not out of the question since it is still winter, and this is the Pacific Northwest. I love snow. Really love it. I love the winter and having four seasons, however, when it gets to February, I am about done with winter, and so ready for spring. That feeling is more intense this year than in years past. And, of course, this is because I am ready to get started.

Luckily, it is also the time of year that I can start tomatoes, peppers and some herbs from seed so the are ready to be transplanted into the garden beds in about 6 weeks. I have tried to do this in the past, and because of my ignorance (lack of knowledge), I did not achieve success. I tried to start seeds in a windowsill. Sounded like a good idea to me. However, this produced “leggy” starts due to the lack of a good, direct light source. Leggy starts end up being a much weaker plant, which means they will not grow as well and thus not produce as well. I also attempted to transplant them into the main garden far to early.

Well, I learned my lesson, so this year I planned on building a grow area with a good light source that would enable me to grow good, healthy, strong starts for planting when the time was right. I decided to make a space in the unfinished basement for this purpose. This was mainly chosen due to limited space on the main floor. The basement is used for storage only, and is rarely visited by anyone other than me. After much research, watching many videos on YouTube and reading several articles on the Internet, I settled on my design, and I went about putting it into place. This is my first expansion/improvement over last year’s garden!

GrowShelf 02-10-2014

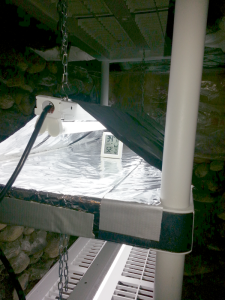
Here is the completed grow shelf. It is an inexpensive shelf unit. It provides 4 shelves, 3′ wide and 18″ deep, on which to start/grow seed starts. Each shelf has a dedicated fluorescent lamp. I am using a T5-type fluorescent bulb that provides 6500 Kelvins. The Kelvins indicate the color temperature that the light outputs. In this case, 6500 K is the same color temperature as daylight. My research indicated that this is the ideal amount to grow seed starts indoors.

One of the concerns, is temperature. Seed germination generally occurs best if the temperature is around 75 degrees plus or minus 10 degrees depending on the type of plant. Because the basement is unfinished (read: unheated), and it is February, it is definitely not warm enough. I considered a few possible ways around this issue, and performed many different tests and layouts looking to hit the magical 75 degrees mark. In the end, what looks to work the best is simply covering the bottom of the shelf with aluminum foil and running foil over the top of the light. When using foil, make sure the shiny side is facing the light to achieve maximum effect.

GrowShel Tinfoil 02-10-2014GrowShelf TInfoil2 02-10-2014

I know the thermometer only reads 52 degrees in the picture. I had just turned the lights on for taking pictures. 🙂 I know I will need to, most likely, alter how I have the foil arranged once I get the seed trays in place, however, I am confident that I can achieve the correct temperature. If I need a little extra warmth, I have some heat lights I can clip to the sides of the shelf.

GrowShelf Chain 02-10-2014

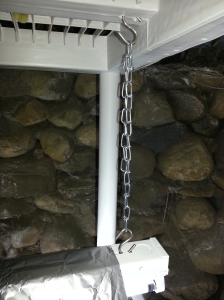
I also hacked the shelf a little. I wanted to attach the lights to a chain so that I could easily raise and lower them as the situation called for. The shelves did not have any holes in the bottom along the center, and I did not want to hang the hooks off-center. I simply drilled some holes in the bottom of the shelf and put the hooks through. Simple and effective!

GrowShelf Timer 02-10-2014

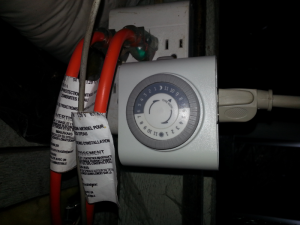
I have all the lights plugged into a power strip. The power strip is plugged into this simple timer. Seeds like about 16 hours of light a day in order to grow the best. I certainly did not want to have to remember when to turn the lights on or off. It makes much more sense to install this timer, set it, and automate this step. I’ll be busy enough watering, fertilizing, and growing the seedlings!

And there you have it. An improvement to the garden, a solution to the problem of growing good, healthy starts indoors, and a simple way to combat the winter blahs all in one. My daughter and I will be planting the first batch of seeds as soon as I get some good, organic, sterile seed starting soil, which will be in about a week.

Until then, Happy Gardening!