Blog Archives

Garden Improvement – Hoop Houses – Update 2

At the end of the previous Hoop House Update, I had the 3/4″ EMT bent and attached to the two 12′ long beds. Since then, I have also attached hoops to two 4’x4′ beds. One is a bed I built this year specifically for my 5 year-old daughter to have her own garden. Jordyns Box, Grid Done, Hoops On 03-05-2014The other is for a dedicated herb bed. You can see both my daughter’s bed in the foreground, and the unfinished (at the time) herb bed (as well as the two uncovered 12′ beds 🙂 ). Next step was to cover them with plastic. I am using 6 mil thick greenhouse plastic that I purchased from greenhousemegastore.com. You do pay a little more for the thick plastic, however, it will last a few years before it needs replacing.Hoop House Putting Plastic On 03-05-2014 
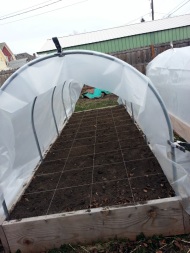
The thinner (4 mil and lower) plastics generally do not last longer than a single season before the sun deteriorates the plastic to the point of disintegration. Once the plastic was over the hoops, I had to cut pieces to cover the ends, and I temporarily held everything in place using spring clamps that I purchased from a hardware store. Hoop House Covered 03-05-2014
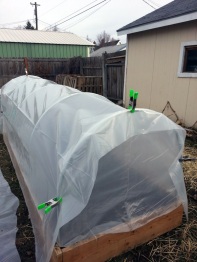
However, I do not intend to use those clamps on a permanent basis, at least not for holding everything in place. Nope! For that, I am using snap clamps purchased from the same store as the plastic. These are nice and handy for holding the plastic to the EMT. They snap in place and securely attach the plastic in place. Hoop House End Completed 03-30-2014 Removing them isn’t very difficult, it just involves prying them off.

Once that was complete on all 4 beds, I trimmed the plastic so it is a little more manageable. I, currently, simply raise the sides and semi-neatly fold it at the top. I am still using the spring clamps to hold the plastic in place, one at either end (so 4 per bed). It is effective, for now, to do it this way. Once I have a little more time, and with less pressing tasks to do, I intend to attach each side to a 2×2. I want to do this for two primary reasons. One, it will add a little weight to each side, which will help keep the plastic down and secure. Two, it will allow the sides to be rolled up much easier and quicker. I do not think I will do an update when I finish that, but I may.

I think the hoop houses are a good investment, and I definitely see them being valuable next fall, and into winter. I think, perhaps. next spring I will attach them to the other 12′ beds, and possibly to the upcoming 24′ x 3′ bed. I haven’t decided.

Until then, Happy Gardening!

2014 Garden – Update 4

I have been lax in updating, I know. It isn’t because I haven’t wanted too, it is because writing about the garden only happens when I am not doing something with the garden, which lately, has been just about non-stop. The weather is slowly improving here in the great Pacific Northwest. The nights are still getting cool, and the days are remaining in the low 60’s for the most part. Due to the improvements, I have been able to plant more plants outside, including sowing some direct into the ground. However, because it is quite cool still, I have planted other crops inside. I have also made some adjustments inside that, I think, have improved what I am seeing big time!

First, the adjustment. As I wrote about in this post, I had the grow shelf in the cool, unfinished basement. And, while the plants that I had germinated, specifically the tomatoes and peppers, where all doing well, they did not seem to growing as fast, or as large, as I would expect. I began to suspect that the cool temperatures may have something to do with this as I know tomatoes and peppers adore the warmer weather, and it takes temperatures of 70-80 degrees for their seeds to germinate. I also began to wonder why I had put the grow shelf in the basement in the first place. There was another, possibly better, site for it. That would be in my ‘office’. A room, upstairs, where I have my computer. My computer is rarely turned off, and as a result, the office remains quite toasty. Last Saturday, the 5th, I made the sudden decision to move everything to the office. It probably only took a couple of hours to move the plants, shelf, and light fixtures upstairs, and re-set it all up.Grow Shelf Upstairs 04-09-2014 The grow shelf, and four grow lights (plus extra ones, sometimes), caused my already warm office to get extra toasty. So much so, in fact, that I have had to begin using the window air conditioner to keep the temperature manageable. Based on the thermometer, it is usually between 71 and 78 degrees in the office now. I have seen the plants respond in a huge way! The tomatoes have exploded as have several of the other varieties. The peppers are also starting to put on some size. Of course, I also transplanted them into bigger containers at this time. This, also, had a big impact on growth. Very exciting, and I am glad I was able to remedy a situation so easily.

Next, the plants I have been able to plant, or direct seed outside:

Cabbage [transplants from seed]:

Cauliflower [transplants from seed]:

Greens [direct seeded]:

Onions [sets]:

Peas [transplants from seed/direct seeded]:

Radishes [direct seeded]:

Carrots [direct seeded]:

  • Purple Haze
  • Rainbow Blend

Potatoes:

  • All Blue
  • French Fingerling
  • Purple Majesty
  • Red Norland
  • Yellow Finn
  • Yukon Gold

Beets [direct seeded]:

Herbs [transplants from seed]:

The garden is starting to green up, and I could not be more pleased. I was able to plant a lot out in April, which last year I was not due to lack of beds. May will see, of course, another huge dose of planting. I am currently preparing for that in the grow room. Meet the newest additions to join the grow room family:

Cucumbers:

Corn:

Nasturtium

I began working, today, on hardening off the tomatoes. In my impatience, I think I left them out too long and some of them got a little sunburned. I do think they will recover quick enough, and I did bring them in tonight, as it is going to be in the upper 30’s, and I am not comfortable leaving them out all night in the hoop houses. I think that may still be a little chilly. The next few nights, however, the temps are supposed to stay in the 40’s at night, so I may try leaving them under the hoops then and see how they do. I am quite anxious to get the tomatoes (and peppers) in the ground, but I do not want to cause any undo stress or other issues for them. Patience is a Virtue, and All Good Things Come to Those That Wait. Those are the mantras I have told myself lately. 🙂

I do have a couple of other updates, but I will save them for their own posts, which, I hope, will not take me as long as this post took to get out. No promises, but I will do my best!

Until then, Happy Gardening!

2014 Garden – Update 3

I am in the land of the Peas! Wow. I seriously did not expect them to take off the way they did. They are getting so big I used some left over wooden dowels to give them support. They are much happier now.

Peas with Dowel Supports 03-19-2014

I also made a startling discovery earlier in the week when I was checking up on everything. I moved some of the peas to another shelf and saw roots growing way out of the bottom.

Pea Roots 03-16-2014

I had an emergency transplanting session the next evening.

Peas 03-19-2014 Peas2 03-19-2014

These particular pea plants are not as tall as the others, so I was completely unaware that they needed more space. All in all, I think I have learned that it is not really necessary to start peas inside. Next year this won’t even be a consideration. They will go right out into the ground as soon as it is workable. The good news is, if all goes as planned (i.e. the weather cooperates), I will be planting them this weekend as well as the onions sets and shallots.

In other garden update news, on the 11th I planted some more plants.

Herbs

Garden Berries

Cabbage

Green Onions

Of these, the onions have begun germinating already. You can see them in the cells behind the peppers.

Peppers and Green Onion 03-19-2014

The Genovese Basil, Lemon Balm, and the Early Wakefield Cabbage is also germinating, however, I did not take a picture of them this time. Over all, all the starts are doing rather well. Tomatoes, Marigolds, Cabbage, and Cauliflower is seen here in this picture. They are all doing well.

Tomatoes, Marigolds, Cabbage and Cailiflower 03-19-2014

I found that some of the tomatoes where on a shelf where the light was a little higher than I would have liked, and I am rather concerned that they may have gotten a little leggy reaching for the light. I have since lowered the light so it is just above the plants. Hopefully the legginess is not too debilitating. You can see them on the right of this picture. On the left is the Chamomile and Plantain, which is doing quite wonderful.

(Possibly)Leggy Tomatoes and Herbs 03-19-2014

Since the seed starting soil I used to germinate in does not have an over abundance of nutrients, on the 15th of March, when I watered them, I added a very diluted organic liquid fertilizer. I do not plan on needing to feed the plants once they are in the ground, as the soil is sufficiently nutrient dense to provide ample food for them as they grow. In addition, this summer I intend on adding my own home brewed compost tea as needed which will provide more nutrients that the plants will love!

Last fall, I planted 20 garlic cloves. I do not recall what kind of garlic it was. All I know is I purchased it in September at one of our local Farmer’s Market. I checked today (March 19th), and  it is looking good!

Garlic1 03-19-2014

There are four in coming up in this picture, but only a couple are easily seen.

Galic 4 Starts 03-19-2014

We also planted 5 Golden Raspberry plants last year. Our dogs had their way with most of them, but as I expected, they are coming back. I suspect they will come back with a vengeance, as we want them to fill the area where we planted them. It is a little hard to see, but this pic does show a shoot coming up. They were so sweet and tasty. I cannot wait to munch on them again this year!

Golden Raspberry 03-19-2014

Everything is going quite well. The time for getting plants in the ground is rapidly approaching, and I cannot wait!

Until then, Happy Gardening!

Garden Improvement – Hoop Houses – Update 1

One of the first garden improvements I am doing this year is adding hoop houses to four of the beds (1 existing, 3 new). I am constructing low hoop houses, specifically. Why? It is one of the best ways for extending the growing season. I do not have the space or money for an actual greenhouse (one day!), and with hoop houses, I don’t really need one. With these on some beds, it allows me to get plants in the ground about a month earlier than without. It will also allow me to grow plants far longer into the fall, and for some crops such as the lettuces, spinaches, kales, etc., I will be able to winter them over and be able to harvest fresh veggies very early the following spring. I had intended to have this completed around the 1st of March, but Mother Nature thought otherwise this year, as I posted about previously, however, that is not a complaint. It just means I have to really haul butt to get them done ASAP.

As in most things, there are many ways to build hoop houses. A very common, and inexpensive, method is to use 1/2″ Schedule 40 PVC pipe. I, originally, was going to go this route. Then I learned that PVC was very bad for the environment. Further, PVC can leach toxins into the ground, which would mean into the garden and into the plants. And, lastly, unless a protective paint is applied, the PVC will deteriorate quickly in the sun. All three of these factors where big negatives for me. I do not want to use something bad for the environment, I definitely do not want chemicals and toxins leaching into the garden, and I do not want to have to replace the pipes every couple of years. I would rather use a solution that would last a long time, and that would not cause harm to its environs.

The other option I looked at was using electrical conduit (EMT) similar to what I used for the trellises. I eventually settled on 3/4″ EMT as opposed to 1/2″. This was for added support and strength. It can get rather windy at times, and I would rather spend a little extra money (still very reasonable, however) for more support. The next issues was, how do I bend the EMT into 4′ wide hoops? Thanks to the Internet and Google, I was able to find a site that sells an appropriate bender to do what I was trying to do. Now that I have explained what and why, allow me to show you how.

Hoop Bender 03-08-2014 Here is the bender attached to the corner of my deck. It is really easy to use, and it allows for both 1/2″ and 3/4″ EMT. Make sure you have plenty of room. The EMT is 10′  long, and it is all used. I had to reposition the bender three times before I was able to bend without difficulty. EMT Being Bent 03-08-2014

For the 12′ long beds, I am using 5 hoops, one every 3′. For the 4′ beds, I am only using 2, one on each end. I have extra EMT in case I need to add extra hoops for stability. Once I had all the hoops bent, I began attaching them to the sides of the garden beds.

Hoop Attachment 03-15-2014

I am using two conduit straps for each hoop, again for extra stability. Soil covers the lower strap, so I did not tighten the screws completely. I want to slip the hoops off easily (or extend them by adding additional EMT) when the plants are large enough without having to disturb the surrounding soil (and plants).

Here is one of the 12′ beds with all 5 hoops attached. Both of the 12′ beds are at this point, and the 4′ beds’ hoops will be very soon.

Hoops Attached to Bed 03-15-2014

Next steps:

  1.  Add greenhouse plastic
  2.  Add an easy way to raise the sides
  3.  Add vents in the ends to prevent over heating
  4.  Monitor daily temperatures

I will make an update post once the hoop houses are completely finished, which really must be soon. The peas are not going to wait much longer!

Until then, Happy Gardening!

2014 Garden – Update 2

This post will largely consist of pics of the growth progress, as I think that will do more than the words I add. I will say, everything is growing quite well! Just about everything has germinated, which includes all the tomatoes, the celery (which, I have read, is hard to grow), and most of the peppers! The peas are doing so well, that I worry I won’t have the beds ready in time!

First a picture of how I have the shelves set up currently. The top shelf is my ‘after germination’ shelf. It is where I move the plants that have germinated well, which occurs on shelf 2. It has the most heat directed at it, since things like tomato seeds and pepper seeds like that. The third self is the ‘medium-height’ shelf. Once a plant is too big for the top shelf, I move it to the third. Don’t ask why I have them ordered so funky. It just happened that way. The bottom, and fourth shelf (which is not seen in this picture), will be where I move the plants that are getting big, like the peas. Grow Shelf (1-3) Confiuration 03-05-2014In most of these pictures, the plant name is visible on the Popsicle stick. This first one is when the celery first pushed above the soil. I took this picture March 6th.

Celery 03-06-2014

Peas!

Peas 03-05-2014

Peas2 03-05-2014

Peas3 03-05-2014

Herbs and Cauliflower.

Herbs and Cauliflower 03-06-2014

Marigolds and Peas, and Cabbage.

Marigold and Peas 03-06-2014

Marigolds and Cabbage 03-06-2014

Tomatoes!

Tomatoes 03-06-2014

Tomatoes2 03-06-2014

Tomatoes3 03-06-2014

Tomatoes5 03-06-2014

This is the very first pepper (Paprika) just starting to push up through the soil. I was so pleased to see this!

Paprika Pepper 03-01-2014

The last photo, I took yesterday, March 9th. I was out working in the beds on an improvement project (that update is coming very soon), and I saw this growing in one of my squares. I had planted onion seed last year, but it did not have time to do anything. It was covered all winter with a blanket of dried leaves, and had wintered-over successfully. I hadn’t meant to do that. Happy accident! 🙂

Winer Over Onions 03-09-2014

And that is how the garden is growing at the start of the second week of March. Time is a ticking, and I need to get a lot done in a short amount of time. Stay tuned for further updates to this series, as well as the start of some new post series’.

Until then, Happy Gardening!

Way To Be Organized!

I am being extremely precise and organized this year when it comes to the garden. However, this gets quite time intensive. I’m sure that will lessen soon since a large part of the work is data entry. I have used a few tools for this. One of these is a fantastic online garden planner. It costs $25 per year to use (although there is a 30 day free trial), and I think it is well worth it. This planner has allowed me to plot where every plant is going to live in the space I have to work with. There are different layers you can have it display, which really helps when you are wanting work on the layout of the drip irrigation system. Or when you are designing the layout and placement of the beds and other features in the garden. Another very useful benefit of using a program like this, is that GardenPlannerOverview 3-7-2014it provides sow/harvest times in an easy to understand layout. The program will also automatically determine the best date to sow the selected plants based on the average last frost date of where you live, which the program obtains from an online service. If you have hoop house, cold frames, and/or green houses, the program takes that into account and will automatically adjust the dates. There is a great deal more that this program can do, and if interested, I recommend you try it for the 30 days. After all, what is there to lose? 

GardenPlannerPlantList 3-7-2014


I also make use of Excel (or equivalent). I maintain a couple of spread sheets. One has the complete list of seeds I have selected to grow this year. ExcelSeedSelection 3-7-2014It has them organized into type (Bean, Tomato, Pepper, etc.), cost, item number (I purchased all my seeds from Baker Creek Heirloom Seeds),  and I use this to track when the seeds need purchased by, since I am buying them over a couple of months, and if I have purchased them yet.

The other spreadsheet contains planting information that tracks when I sowed the seeds, when they germinated, when I transplant them, when I fertilize, etc. And the item numbers of each plant cross-reference in the seed selection spread sheet.ExcelSeedLog 3-7-2014

I have found these “tools” indispensable this year. There are many ways to get and stay organized, and many tools that one can use. I am in no way saying that this way is the best. It is the best for me, right now. It may change, and if it does, I will update everyone. And while I am quite certain it is possible to grow a successful garden without spending the time to carefully plan the garden and track each varieties growth data, I think doing so will pay much larger dividends in the future, and I find it quite enjoyable to do it. However, I am, a geek, so take that into consideration.

Until next time, Happy Gardening!

2014 Garden – Update 1

The weather is still quite funky. The temps where down to the teens for a high on March 1st. Then we got 5+ more inches of snow. What a start to March! 🙂

I have been busy. Both with my day job, and with the garden. This has made me quite lax in writing, however, sleep comes before writing. These garden update posts will focus on the actual planting, growing, and harvesting that goes on for the garden. So, without further adieu, on to the update…!

I sowed the first seeds over the weekend of the 22nd of February. These are all indoor starts, and are growing on the grow shelf I built. So far I have planted:

Cabbage Cauliflower Celery
Mammoth Red Rock Purple of Sicily Giant Red Re-Selection
Glory of Enkhuizen Snowball Self-Blanching Utah Tall
Herbs Peas Flowers
Chamomile Désirée Dwarf Blauwschokkers Petite Mix Marigold
Crown Jewels Chia Golden Sweet Snow
White Horehound Little Marvel Garden
Korean Hyssop Oregon Sugar Pod II
Oregano Vulgare
Plantain
Summer Savory
Shiso
Toothache Plant
Lemon Balm
Broad Leaf Sage
Valerian
Hot Peppers Sweet Peppers Tomatoes
Black Hungarian Corno Di Toro Giallo Black Krim
Cayenne Long Thin Golden Cal Wonder Blue Berries
Chinese Five Color Golden Marconi Blush
India Jwala Peperone Di Cuneo Pink Brandywine
Leutschauer Paprika Quadrato D’Asti Rosso Chadwick Cherry
Mustard Habanero Gypsy
Purple Jalapeno Ivory Pear
Martino’s Roma
Michael Pollan
Orange Icicle
Pineapple
Tasmanian Blushing

Phew! No wonder I haven’t had much time to write! 🙂 If you  look at some of those beautiful plants, you will see that I am going to, hopefully, grow a very colorful garden this year. But, I digress..

I have found that nurturing plants from seeds is enjoyable. I tend to think of them as my babies, and right now they need extra tender care and careful monitoring. Unsurprisingly, the cabbages and cauliflowers where the first to germinate. These plants do quite well in cooler temperatures, and as I said in an earlier post, the basement is on the cool side. Interestingly, only the Mammoth Red Rock cabbage has germinated. The Glory of Enkhuizen hasn’t. I find that odd, but I am still monitoring the situation.

Cabbage and Cauliflower Germinating 2-26-2014

(this shows the Mammoth Red Rock Cabbage in the foreground and the Purple of Sicily Cauliflower in the back) Cauliflower Germinating 2-26-2014

These guys popped up on the 26th, and I was glad to see them. It was a bit of a relief to see those green little nubs poking above the soil. It let me        know I was doing something right.

 The peas began pushing themselves through next. Peas and some of the herbs (although I only took pictures of the peas). 

Peas Germinating 2-28-2014Peas Germinating2 2-28-2014 All of the varieties of peas I planted started to come up at all about the same time, about the 27th of February. Peas are not very shy about it, either. They practically shoot out of the dirt. It would be fun to have a time-lapse camera on the shelves. Maybe one year. 🙂

I began to get a little concerned over the lack of growth I was seeing from the tomatoes. I had friends with tomatoes that came up after only a couple of days. I know that they need a warmer soil temperature to germinate quickly.

Tomatoes Germinating 03-03-2014

I rearranged their placement onto another shelf, and added four additional heat lamps. After only 2 days of that, I started to see tomatoes! I took this picture on the 3rd of March. There are also even more herbs growing. Now, the only thing I am waiting for, is the peppers. They can take a while longer due to their seeds, and they also require warm soil, warmer than tomatoes, even. I may need to rearrange again for them to do well. Time will tell.

I will take some more pictures in the next couple of days as the young plants grow while I wait for Winter to retire.

Until then, Happy Gardening!