Blog Archives
Garden Improvement – Hoop Houses – Update 2
At the end of the previous Hoop House Update, I had the 3/4″ EMT bent and attached to the two 12′ long beds. Since then, I have also attached hoops to two 4’x4′ beds. One is a bed I built this year specifically for my 5 year-old daughter to have her own garden.  The other is for a dedicated herb bed. You can see both my daughter’s bed in the foreground, and the unfinished (at the time) herb bed (as well as the two uncovered 12′ beds 🙂 ). Next step was to cover them with plastic. I am using 6 mil thick greenhouse plastic that I purchased from greenhousemegastore.com. You do pay a little more for the thick plastic, however, it will last a few years before it needs replacing.
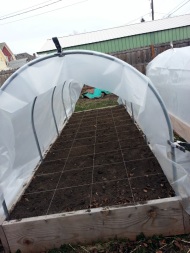 The thinner (4 mil and lower) plastics generally do not last longer than a single season before the sun deteriorates the plastic to the point of disintegration. Once the plastic was over the hoops, I had to cut pieces to cover the ends, and I temporarily held everything in place using spring clamps that I purchased from a hardware store.
 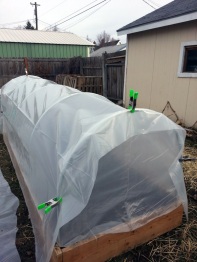 However, I do not intend to use those clamps on a permanent basis, at least not for holding everything in place. Nope! For that, I am using snap clamps purchased from the same store as the plastic. These are nice and handy for holding the plastic to the EMT. They snap in place and securely attach the plastic in place.
  Removing them isn’t very difficult, it just involves prying them off.
Once that was complete on all 4 beds, I trimmed the plastic so it is a little more manageable. I, currently, simply raise the sides and semi-neatly fold it at the top. I am still using the spring clamps to hold the plastic in place, one at either end (so 4 per bed). It is effective, for now, to do it this way. Once I have a little more time, and with less pressing tasks to do, I intend to attach each side to a 2×2. I want to do this for two primary reasons. One, it will add a little weight to each side, which will help keep the plastic down and secure. Two, it will allow the sides to be rolled up much easier and quicker. I do not think I will do an update when I finish that, but I may.
I think the hoop houses are a good investment, and I definitely see them being valuable next fall, and into winter. I think, perhaps. next spring I will attach them to the other 12′ beds, and possibly to the upcoming 24′ x 3′ bed. I haven’t decided.
Until then, Happy Gardening!
Garden Improvement – Hoop Houses – Update 1
One of the first garden improvements I am doing this year is adding hoop houses to four of the beds (1 existing, 3 new). I am constructing low hoop houses, specifically. Why? It is one of the best ways for extending the growing season. I do not have the space or money for an actual greenhouse (one day!), and with hoop houses, I don’t really need one. With these on some beds, it allows me to get plants in the ground about a month earlier than without. It will also allow me to grow plants far longer into the fall, and for some crops such as the lettuces, spinaches, kales, etc., I will be able to winter them over and be able to harvest fresh veggies very early the following spring. I had intended to have this completed around the 1st of March, but Mother Nature thought otherwise this year, as I posted about previously, however, that is not a complaint. It just means I have to really haul butt to get them done ASAP.
As in most things, there are many ways to build hoop houses. A very common, and inexpensive, method is to use 1/2″ Schedule 40 PVC pipe. I, originally, was going to go this route. Then I learned that PVC was very bad for the environment. Further, PVC can leach toxins into the ground, which would mean into the garden and into the plants. And, lastly, unless a protective paint is applied, the PVC will deteriorate quickly in the sun. All three of these factors where big negatives for me. I do not want to use something bad for the environment, I definitely do not want chemicals and toxins leaching into the garden, and I do not want to have to replace the pipes every couple of years. I would rather use a solution that would last a long time, and that would not cause harm to its environs.
The other option I looked at was using electrical conduit (EMT) similar to what I used for the trellises. I eventually settled on 3/4″ EMT as opposed to 1/2″. This was for added support and strength. It can get rather windy at times, and I would rather spend a little extra money (still very reasonable, however) for more support. The next issues was, how do I bend the EMT into 4′ wide hoops? Thanks to the Internet and Google, I was able to find a site that sells an appropriate bender to do what I was trying to do. Now that I have explained what and why, allow me to show you how.
 Here is the bender attached to the corner of my deck. It is really easy to use, and it allows for both 1/2″ and 3/4″ EMT. Make sure you have plenty of room. The EMT is 10′ long, and it is all used. I had to reposition the bender three times before I was able to bend without difficulty.
For the 12′ long beds, I am using 5 hoops, one every 3′. For the 4′ beds, I am only using 2, one on each end. I have extra EMT in case I need to add extra hoops for stability. Once I had all the hoops bent, I began attaching them to the sides of the garden beds.

I am using two conduit straps for each hoop, again for extra stability. Soil covers the lower strap, so I did not tighten the screws completely. I want to slip the hoops off easily (or extend them by adding additional EMT) when the plants are large enough without having to disturb the surrounding soil (and plants).
Here is one of the 12′ beds with all 5 hoops attached. Both of the 12′ beds are at this point, and the 4′ beds’ hoops will be very soon.

Next steps:
- Add greenhouse plastic
- Add an easy way to raise the sides
- Add vents in the ends to prevent over heating
- Monitor daily temperatures
I will make an update post once the hoop houses are completely finished, which really must be soon. The peas are not going to wait much longer!
Until then, Happy Gardening!
